A Brief History of Hand Planes
Hand planes have been essential woodworking tools for centuries. These simple yet versatile implements have shaped wood since ancient times. Egyptians used bronze planes as far back as 2700 BCE. However, the modern hand plane design emerged in the late 1700s. Joseph Moxon’s book “Mechanick Exercises” first described the parts of a plane in detail. This publication sparked rapid advancements in plane design. Craftsmen soon developed a wide variety of specialized planes. Each type served a specific purpose in woodworking. The industrial revolution brought mass production of metal planes. Stanley Rule and Level Company became a leading manufacturer in the late 1800s. Their Bailey-pattern planes set the standard for modern hand planes. Today, both vintage and new hand planes remain indispensable for fine woodworking.
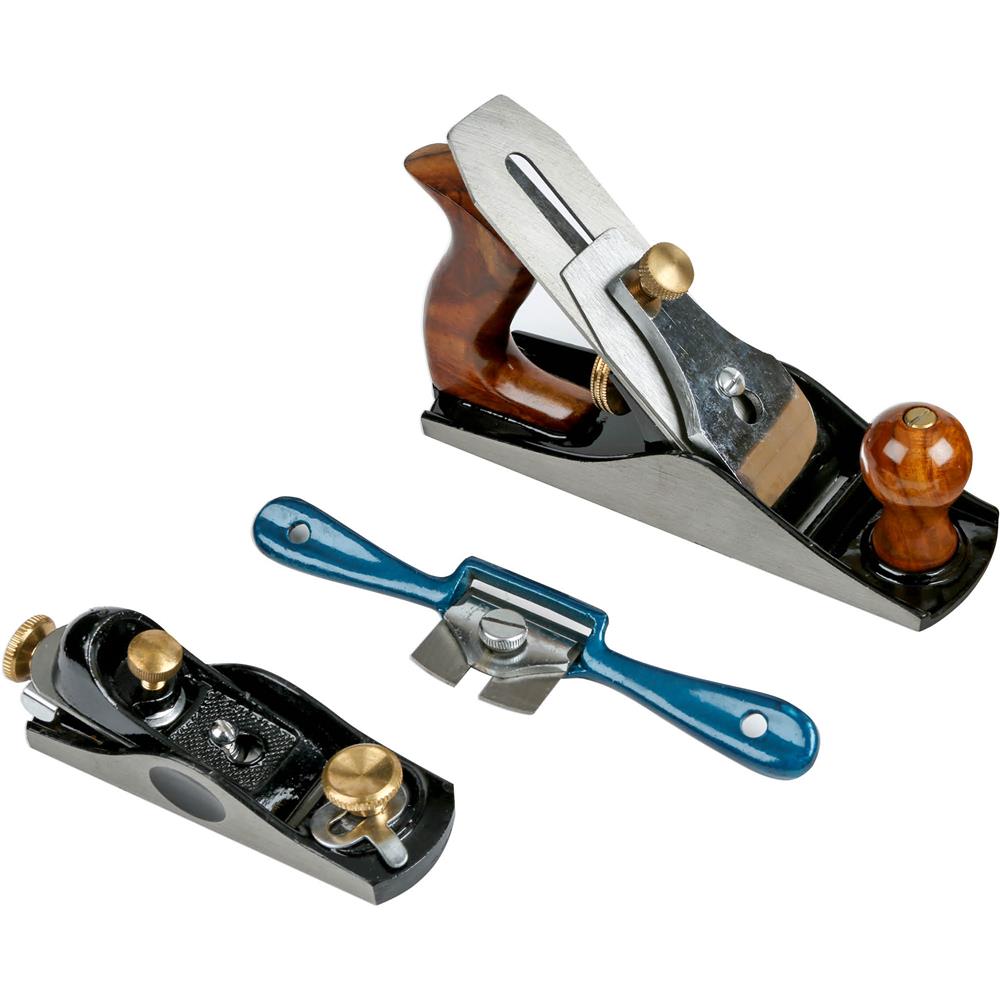
Types of Hand Planes and Their Uses
Hand planes come in many shapes and sizes. Each type excels at specific tasks. Bench planes are the most common and versatile. They include jack planes, smoothing planes, and jointer planes. These tools handle general-purpose flattening and smoothing of wood surfaces. Specialized planes serve more specific functions. Block planes, for instance, excel at end grain work and chamfering edges. Rabbet planes cut grooves and rabbets along the edges of boards. Molding planes create decorative profiles and shapes. Shoulder planes refine tenons and other joinery cuts. Scrub planes quickly remove large amounts of wood for rough dimensioning. Plough planes cut grooves for panels or joinery. Low-angle planes work well on difficult grain patterns. Combination planes perform multiple functions with interchangeable blades. Understanding these various types helps woodworkers choose the right tool for each job.
Anatomy of a Hand Plane
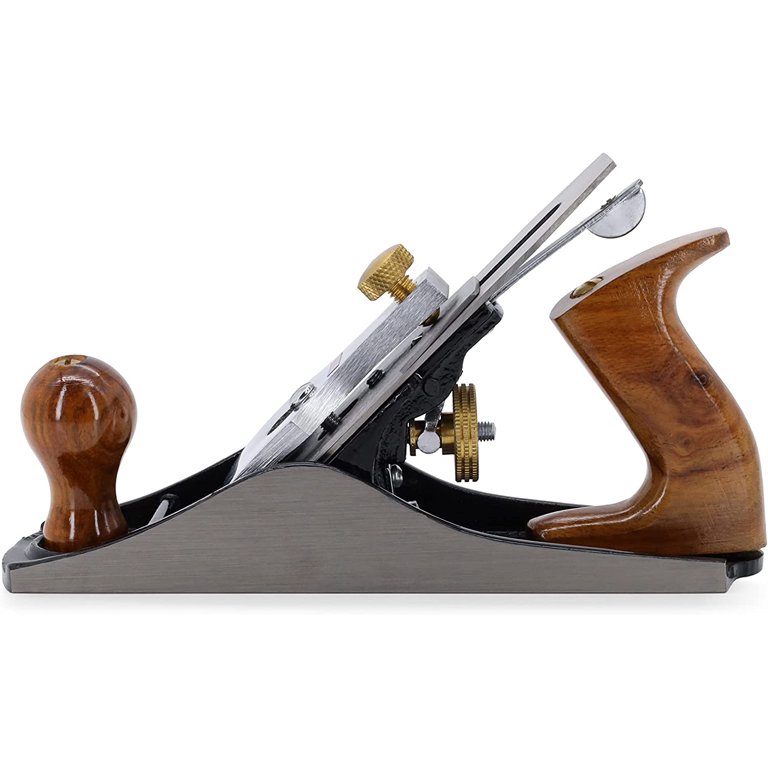
Understanding the parts of a hand plane is crucial for proper use and maintenance. The body of the plane, traditionally made of wood or metal, forms its main structure. A sole on the bottom provides a flat surface for smooth operation. The blade, or iron, does the actual cutting. It sits at an angle in the body, secured by a cap iron and lever cap. The cap iron breaks the wood shavings, preventing tear-out. A frog supports the blade assembly and allows for adjustment. The depth adjustment knob controls how far the blade protrudes. The lateral adjustment lever fine-tunes the blade’s alignment. A tote (rear handle) and knob (front handle) provide grip for the user. The mouth opening allows shavings to exit. Some planes feature an adjustable mouth for greater control. Knowing these components helps woodworkers troubleshoot issues and achieve optimal performance.

Choosing the Right Hand Plane for Your Project
Selecting the appropriate hand plane depends on the task at hand. For general-purpose work, a jack plane or smoothing plane often suffices. These versatile tools handle a wide range of planing tasks. However, specialized projects may require more specific planes. Consider the size of the workpiece when choosing a plane. Larger surfaces benefit from longer planes, which provide better accuracy. Smaller projects may call for more compact options like block planes. The type of wood being worked also influences plane selection. Harder woods may require a lower blade angle to reduce tear-out. Some planes offer adjustable mouths, allowing for fine-tuning based on wood grain. Budget also plays a role in selection. While high-end planes offer superior performance, many affordable options work well for hobbyists. Ultimately, a combination of different planes provides the most versatility for various woodworking tasks.
Preparing a Hand Plane for Use
Proper preparation ensures optimal performance from a hand plane. Begin by checking the sole for flatness. A truly flat sole is crucial for accurate planing. Use sandpaper on a flat surface to true up the sole if necessary. Next, focus on the blade. A sharp blade is essential for clean cuts. Use sharpening stones or sandpaper to hone the blade to a razor-sharp edge. Set the cap iron close to the cutting edge to prevent tear-out. Adjust the frog position to control the size of the mouth opening. A tighter mouth works better for fine shavings, while a more open mouth allows for heavier cuts. Lubricate moving parts with light machine oil to ensure smooth operation. Finally, test the plane on scrap wood and make fine adjustments as needed. Taking time to properly set up a hand plane pays off in improved results and easier operation.

Techniques for Effective Hand Planing
Mastering hand plane techniques takes practice but yields superior results. Start by securing the workpiece firmly to prevent movement. Grip the plane with both hands, applying downward pressure with the dominant hand on the tote. Use the other hand on the knob for guidance and additional pressure. Begin each stroke at the far end of the board, lifting the plane slightly at the start. Apply even pressure throughout the stroke, easing off at the end to prevent damage to the board’s edge. Work with the grain whenever possible to avoid tear-out. For difficult grain, try skewing the plane or taking lighter cuts. When planing wide boards, overlap each pass slightly to ensure even results. For final smoothing, take very light cuts with a finely set smoothing plane. Pay attention to the sound and feel of the plane; a well-tuned plane produces a satisfying whisper and smooth action.
Common Problems and Solutions in Hand Planing
Even experienced woodworkers encounter issues when hand planing. Tear-out, where wood fibers are ripped instead of cleanly cut, is a common problem. To address this, try adjusting the mouth opening, sharpening the blade, or planing from a different direction. Chatter marks, small ridges left on the surface, often result from excessive blade projection or inadequate downward pressure. Reducing the depth of cut and applying more pressure can help. Difficulty starting a cut may indicate a blade set too deep or a board edge that’s not square. Plane tracks, visible lines left on the surface, suggest an uneven blade or sole. Carefully adjusting the lateral alignment or truing the sole can resolve this issue. Planes that clog frequently may have too wide a mouth or a dull blade. Regular cleaning and maintenance prevent many common issues. Remember, patient troubleshooting and practice lead to better results over time.
Maintaining and Caring for Hand Planes
Regular maintenance keeps hand planes in top working condition. After each use, clean the plane thoroughly to remove wood dust and debris. Use a brush or compressed air to clear out hard-to-reach areas. Occasionally disassemble the plane for a deep cleaning. Apply a light coat of oil to metal parts to prevent rust. Store planes in a dry environment, ideally with a protective cover. Periodically check the sole for flatness and true it if necessary. Keep blades sharp with regular honing. A few strokes on a fine stone between projects maintains the edge. Inspect the cap iron and frog for proper seating and adjust as needed. Lubricate moving parts like the depth adjustment mechanism. Address any signs of wear or damage promptly to prevent further issues. With proper care, quality hand planes can last for generations, becoming cherished tools in a woodworker’s arsenal.

Integrating Hand Planes into Modern Woodworking
While power tools dominate many woodshops, hand planes still play a crucial role in modern woodworking. They offer precision and control that machines can’t match. Hand planes excel at final surface preparation, often producing a smoother finish than sanding. They’re indispensable for fitting and adjusting joinery. Many woodworkers use a combination of power and hand tools for efficiency. Rough dimensioning might be done with power tools, followed by hand planing for final surfacing. Hand planes also shine in situations where power tools are impractical, such as working with antiques or in tight spaces. They produce less dust and noise than power sanders, making them ideal for small workshops. Moreover, the tactile feedback from hand planing helps woodworkers develop a deeper understanding of wood properties. Embracing both traditional and modern tools leads to more versatile and satisfying woodworking.
The Enduring Appeal of Hand Planes in Woodworking
Hand planes hold a special place in woodworking culture. Their simplicity and effectiveness have stood the test of time. Many woodworkers find a meditative quality in the rhythmic process of hand planing. The direct connection between tool and material fosters a deeper appreciation for the craft. Hand planes also offer environmental benefits. They consume no electricity and produce biodegradable waste. The durability of well-made planes makes them a sustainable choice. Collectors prize vintage planes for their history and craftsmanship. However, modern manufacturers continue to innovate, combining traditional designs with new materials and manufacturing techniques. Whether using a century-old tool or a cutting-edge design, woodworkers appreciate the control and finesse hand planes provide. As long as people work with wood, hand planes will remain essential tools, bridging past and present in the timeless craft of woodworking.
